My Right Now Obsession

My obsession of the moment.
Showing posts with label sandwich bag. Show all posts

Sunday, July 22, 2012

Happy Birthday!

My sister's birthday is tomorrow. We celebrated yesterday and for the occasion I thought balloon nails would be really cute. There were a lot of balloon manicures out there but I thought the cartoon balloons were the cutest. I did the plastic baggy method for my right hand and figured since I was at it I'd go ahead and do 10 balloons and take care of both hands at once.


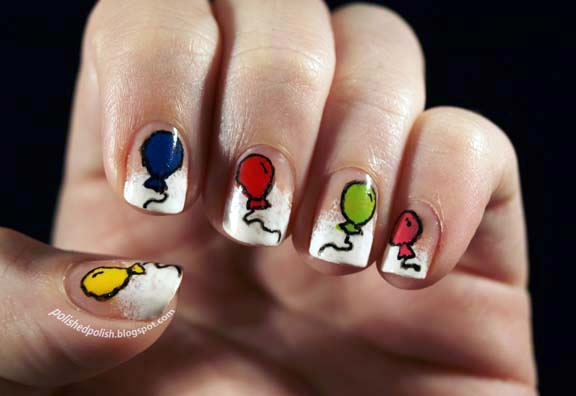
First I sponged SH Hard to get on the tips. For the balloons, I used e.l.f. Smokin' Hot, Pure Ice French Kiss, SH Lickety Split Lime, Art Deco Intense Pink, and Art Deco Yellow. After that I outlined them with a black SH Nail Art Pen and topped it off with a Seche Vite topcoat.


My sister was nice enough to share a couple of extra dotting tools with me so maybe tomorrow I'll try to recreate the cupcake nails she did for herself!

Tuesday, July 17, 2012

Gold Vein

I was trying to achieve the look of an actual vein of gold:


I wanted a shimmery peach color, but I didn't have it so I had to do some layering to get the color I wanted. Sorry I should have used a flash to get the color to show better. For the gold I painted gold polish on a small piece of a crumpled up sandwich bag and patted it on.


I used Milani Metallic Mango for the base and did a very sheer layer of SH Lavender Marquis which toned down the orange to give it a shimmery peach color. For the gold, I used Immortal Gold by JLB Cosmetics with, of course, a Seche Vite topcoat. 


The gold came in a pack of 7 metallics that work beautifully for painting a full nail or stamping. I've found 2 different packs of 7 colors at Ross for $5.99 each. They're the most pigmented and smooth polishes and I wish I could get more without having to stop in Ross randomly. The only downside is the metallics and glitters smell awful, but it's definitely worth it for the end result.


Sunday, July 15, 2012

How to: Pre-Painted Nail Art

This is easy way to add cute designs to your dominant hand or either hand to avoid redoing an entire nail for one mistake!


1. Start by printing a simple scaled down version to fit your nail of the image you want.
2. Place a plastic sandwich bag over the printed image and paint nail polish directly onto the baggy. For this I used Wet n Wild Black Creme with an acrylic paintbrush.
3. Once the image is filled in, let dry. The dry time will vary depending on how thick you apply the nail polish. Using just enough polish to achieve 100% opacity, the dry time was only 10 minutes for me. Gently peel off the image. If it's not peeling easily, let dry a little longer.
4. Now you can place the image directly onto your nail. It doesn't matter which side of the image is facing up. Apply a topcoat and you're all done! Be careful, your image may streak if you're not careful applying the topcoat.